
Docs
How the plugins work, what each setting does, and what to do when something comes out wrong.
The basics
All five plugins work the same way, so this part is worth reading once. After that, skip to whichever plugin you are using.
What you need
- Adobe Photoshop 24.0 or later, installed and working. These are UXP plugins rather than scripts, so they install and update like proper add-ons.
- A source folder of the files you want to work on.
- An output folder for the results. It can be one you have used before, since the plugins skip anything already exported, but a fresh folder is easiest to keep track of.
Your originals are never modified. Every plugin reads from your source folders and writes new files to the output folder, and nothing else on your disk is touched.
Installing
Install the plugin into Photoshop, then restart Photoshop so it picks up the new panel. You will find it under the Plugins menu. Everything happens in that one panel.
Scan, Run and Stop
The three buttons at the bottom of every panel do the same thing in each plugin.
- Scan A dry run. Opens each file, checks it against your settings, and closes it again without exporting or modifying anything. It is free, unlimited, and the thing that catches a mistake before it costs you forty bad files.
- Run Does the batch for real. Leave Photoshop alone while it works rather than using it for something else at the same time.
- Stop Halts after the file it is currently on. Everything already exported stays where it is.
Export settings
Every plugin exports as JPEG or PNG with a quality setting. PNG is the right choice when you need transparency; JPEG is smaller and right for everything else.
Skip existing leaves alone anything already sitting in the output folder. It is what lets you stop a run, add more files and start again without redoing the ones that finished.
The free tier
Each plugin exports ten files free. It is a one time allowance per plugin rather than a monthly one, counted on your own machine, and Scan never counts against it.
Paid plans are not switched on yet. The plugins run on the free allowance today. Licence keys and subscriptions are being set up, and this page will cover activating one when they are live. Nothing on the pricing page is chargeable until then.
Mockup Automator
Applies every image in your artwork folder to every PSD template in your mockups folder, and exports each combination.
Folders
Three of them, kept separate. The plugin reads the first two and writes only to the third.

- Mockups Your PSD templates, each containing a smart object layer where the artwork goes.
- Artwork The images to place into them.
- Output Where the finished mockups land.
The smart object layer is the part that matters. If a template has the artwork flattened into the background rather than sitting in a smart object, the plugin has nothing to swap and that template gets skipped.

What Scan tells you
Scan opens every PSD in your Mockups folder and reports, for each one:
- How many smart objects, meaning placeholders, it found in the file
- Which one it picked as the artwork placeholder, marked with a
> - The size of the whole job: mockups multiplied by artwork, so the number of exports Run would produce
Scan needs your Mockups and Artwork folders set, but not Output. Nothing gets written to disk, so there is nowhere for it to write.
How the plugin finds the artwork layer
Every mockup PSD has a smart object layer where your artwork goes, but the people who make those templates all name it differently. Mockup Automator recognises the names that come up most often, which is why most packs simply work the moment you point at them. The list it matches against is:
add your art        artwork
add your design     art
your design here    image
design              photo
object              print
If none of those turn up, the plugin falls back to the first smart object it finds in the file. That is a reasonable guess and often the right one, but it is a guess, which is exactly what Scan exists to show you before a run rather than after.
If Scan picked the wrong layer, or found none
The fix is in the PSD rather than in the plugin. Open the template in Photoshop, find the smart
object your artwork is meant to go into, and rename that layer to any of the names above —
artwork is as good as any. Save the PSD and Scan again; the > marker
should now sit on the layer you renamed. You only have to do this once per template, not once per
run.
Renaming a smart object layer changes nothing about how the template looks or works. It is a label, not a setting.
Placement
How your artwork sits inside the placeholder when the two are not the same shape.
- Fill and crop The default. Covers the placeholder completely and crops the overflow, keeping the aspect ratio. The Horizontal and Vertical dropdowns decide which part survives — if your subject sits low in the frame, setting Vertical to the bottom stops the crop cutting it off.
- Contain Fits the whole artwork inside without cropping. Nothing is lost, but if the shapes differ you will see the placeholder behind it on two sides.
- Stretch Forces the artwork to the placeholder's exact shape, distorting it if they do not match. Only use this when you know the shapes are the same.
- Original Places the artwork at its own size with no scaling. Useful when the template was built around a specific pixel size.
Filenames
Build the output name from {artwork}, {psd} and {index}
tokens so files land already named the way your store wants them. Folder per
artwork gives each artwork its own subfolder rather than one flat pile, which keeps a
thirty-template run navigable. There is also an optional long-edge cap in pixels; leave it at zero
to export at the template's native resolution.
Split 3 Automator
Splits one whole image into three print-ready triptych panels. Two folders: Artwork and Output.

Panel sizes
Every size in the dropdown is the total finished panel — the physical thing that arrives and goes on the wall. Three of them side by side make up the combined face, and that is the shape your source image wants to be.
- 60 × 90 cm2:3 per panel. Combined face 180 × 90 cm — a 2:1 source.
- 75 × 100 cm3:4 per panel. Combined face 225 × 100 cm — a 2.25:1 source.
- 59.4 × 84.1 cmTrue A1, 1:√2. Combined face 178.2 × 84.1 cm.
- 60 × 60 cmSquare. Combined face 180 × 60 cm — a 3:1 source.
- 60 × 75 cm4:5 per panel. Combined face 180 × 75 cm — a 2.4:1 source.
- CustomAny width and height in centimetres.
Those combined faces assume no edge treatment. Tick a wrap or a border and they change, for the reason in the next section.
Edge treatment
Tick one, or neither. Both are off by default. This is the part that catches people out, so it is worth being precise: an edge is taken out of the panel size, not added to it. The size you picked is what arrives; the edge eats into it from all four sides.
A 60 × 90 cm panel with a 35 mm wrap has a visible face of 53 × 83 cm — 35 mm off every edge means 7 cm off the width and 7 cm off the height. Across three panels that is a 159 × 83 cm combined face, so the source ratio the panel asks for shifts from 2:1 to roughly 1.9:1. The panel does this arithmetic live. Read the ratio after you have set the edge, not before.
- Mirrored wrap For stretched canvas. The outer band of the image is reflected so the picture continues around the side of the frame bar, instead of ending in a smeared band at the corners. Depth in millimetres — see wrap depth.
- White border For paper prints framed behind glass. A plain white margin instead of a reflection, suggested automatically from the panel size and editable.
- Neither A flush crop, so the visible face is the full panel size. For printers who apply their own bleed, or panels being mounted flat.
Gap
The space you intend to leave between panels on the wall, in centimetres. Set a value and that
much image is removed between panels, so the picture still lines up across the gaps once it is
hung. Left at 0, nothing is removed and the three panels are continuous slices
— you can still hang them apart, but the picture jumps slightly at each join. Plenty of
people prefer the continuous cut; it is a matter of taste.
Crop from
When the source is not the shape the panel asks for, this decides which part survives: centre, top, bottom, left or right. Centre is the default. Change it when the subject sits off to one side, or when there is sky you would rather lose than foreground.
Output naming
Panels are named after the source file and numbered left to right:
headland.jpg   →   headland-1.jpg     left panel
                   headland-2.jpg     centre panel
                   headland-3.jpg     right panel
The numbering is the hanging order. Keep it when you send the files to print, because
-2 is the only one that is unambiguous once the names are gone.
Mirrored Edge Automator
Wraps a single image with a mirrored gallery-wrap edge. No splitting — for that, use Split 3 Automator, which can apply the same wrap to each panel. Two folders: Artwork and Output.

Sizes and the visible face
As in Split 3, every size is the total finished canvas and the wrap is taken out of it rather than added to it. The figures below assume the default 35 mm wrap.
- 60 × 90 cmPortrait. Visible face 53 × 83 cm.
- 90 × 60 cmLandscape. Visible face 83 × 53 cm.
- 75 × 100 cmPortrait. Visible face 68 × 93 cm.
- 100 × 75 cmLandscape. Visible face 93 × 68 cm.
- 150 × 100 cmLandscape. Visible face 143 × 93 cm. The largest preset, and the one that asks most of your original.
- 36 × 28 cmLandscape, small format. Visible face 29 × 21 cm.
- CustomAny width and height in centimetres.
If a customer has ordered a specific visible size, work backwards: add twice the wrap depth to each dimension and enter that as a custom size. A 60 × 90 cm visible face with a 35 mm wrap means a custom size of 67 × 97 cm.
Wrap depth
The depth should match the stretcher bar the canvas is going onto, not the look you are after. Too shallow and the wrap runs out before it reaches the back of the bar; too deep and it eats into the front of the picture. The four depths printed under the field are the ones worth knowing.
- 25 mmA slim lip. Suits smaller canvases and thin bars.
- 35 mmThe classic rebate, and the default. If you do not know your bar depth, start here.
- 38 mmFlush with a 38 mm bar, with nothing to spare.
- 45 mmA 38 mm bar plus allowance for gripping and stapling the canvas at the back.
Sending files to a print lab rather than stretching them yourself? Ask them what wrap depth they want before you run a batch. Getting it wrong means reprinting, not re-editing.
Crop from
Centre, top, bottom, left or right, for when the source is not the shape of the finished canvas. Bear in mind that the outer band of whatever survives the crop is what gets mirrored, so a composition with something important right at the edge will have that thing reflected down the side of the canvas.
Auto Upscaler
Enlarges undersized images to print resolution. Two folders: Artwork and Output.

This plugin only ever makes images bigger. Anything already large enough for your target is passed through untouched, apart from having its resolution normalised to 300 dpi. It never downscales, never crops and never changes the shape of a picture.
Target size
Pick the size you are printing at. The presets cover the paper sizes and the canvas sizes that come up most: A4, A3, 36 × 28, A2, A1, 60 × 90, 75 × 100, A0, 80 × 120, 90 × 120 and 150 × 100 cm, plus Custom.
The size is written as width × height, but only the longer of the two actually does anything. It is turned into a pixel target for the long edge at 300 dpi — 150 × 100 cm becomes 17,717 pixels — and the short edge follows from your image's own aspect ratio. That is why a portrait and a landscape file can both be run against the same target without either being reshaped.

Method
- Preserve Details Photoshop's established enlargement algorithm. Works on every supported version, and is the safe default.
- Deep Upscale Photoshop's newer AI enlargement, on versions that have it. If the version you are running does not, the plugin falls back on its own rather than failing the batch.
What Scan tells you
Scan reports each image's true resolution against the pixel target, so you can see which files will be enlarged, by how much, and which are already big enough to pass straight through.
Upscaling is not magic and this is worth saying plainly: enlarging a small file invents detail that was never captured. A 2000 pixel wide JPEG taken to a 150 cm canvas will look soft on a wall whatever algorithm is used. Treat a big enlargement factor as a reason to find a better original, not as a solved problem.
Watermark Automator
Places one logo onto a folder of photos. Three folders this time: Photos to watermark, a Logo, and Output.

The logo
A transparent PNG works best, because the logo is composited on top of each photo exactly as it is — whatever is in the file is what lands on the picture. A logo on a solid white background will put a solid white box on every photo.
Corner mode
The default. The logo goes into one of five positions, and the three sliders are all percentages of the photo's own width rather than fixed pixel values — which is what makes the result consistent across a folder of mixed sizes and orientations.
- CornerFive positions, defaulting to bottom right.
- SizeThe logo's width as a percentage of the photo's width. 20% is the default.
- OpacityHow strongly it sits over the picture. 70% by default.
- MarginThe gap from the edge, again as a percentage of the photo's width. Ignored when the logo is centred, since there is no edge to sit away from.
Tile mode
Tick Tile across the whole image and the logo is repeated in a grid over the entire frame instead of sitting in a corner. This is for protecting preview images rather than signing a finished piece — a tiled mark is a great deal harder to crop or clone out than a corner one.
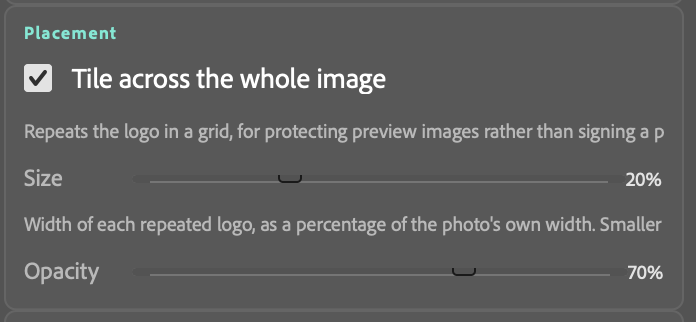
Spacing is worked out for you from the logo size, so there is nothing to lay out. Size still sets the width of each repeated logo as a percentage of the photo's width — smaller values mean more tiles — and the grid is capped at 200 tiles so an extremely small setting cannot turn a batch into an overnight job.
If something goes wrong
A mockup template gets skipped Mockup Automator
The PSD almost certainly has no smart object layer for the artwork, so there is nothing to swap. Scan will have told you it found none.
The wrong layer is being used Mockup Automator
Multi-layer templates often have several smart objects and the plugin can land on a frame or a background layer. Rename the right one and Scan again — see how the plugin finds the artwork layer.
My print came out smaller than the size I picked Split 3 & Mirrored Edge
The size you choose is the finished panel or canvas, and the wrap or border is taken out of it rather than added to it. If you need a specific visible face, add twice the wrap depth to each dimension and enter that as a custom size.
The wrap edge is the wrong depth Split 3 & Mirrored Edge
The depth has to match the stretcher bar, not the look you want. 35 mm is the usual starting point and 45 mm gives your stretcher something to grip. Ask your printer what they need before running a batch.
The composition is cropped badly Split 3 & Mirrored Edge
Your source is not the shape the panel asked for, so it has cropped to fit. Change Crop from, or crop the image to that ratio yourself before you run.
The picture does not line up on the wall Split 3
Check the Gap value against the gap you actually hung at. If Gap was left at zero the panels are continuous slices, so the image shifts by the width of each gap.
The sides of the canvas look odd Mirrored Edge
A mirrored wrap reflects whatever is at the edge of the picture, so a strong horizon, a figure or a hard line sitting right on the edge will appear twice. Changing Crop from, or starting from a slightly wider original, usually fixes it.
The result still looks soft Auto Upscaler
Enlargement cannot recover detail that was never there. Run Scan to see how far each file is being pushed; a large factor means the original is the problem.
The watermark is a white box Watermark Automator
Your logo file has a solid background rather than a transparent one. Re-export it as a PNG with transparency.
The run stops partway
Usually the ten export limit being reached. The panel says so when it happens. Anything already exported is unaffected.
Photoshop becomes unresponsive
Large files at 300 dpi are big documents and Photoshop can sit on one for a while without redrawing. Give it time before assuming it has hung. Using Photoshop for something else during a run causes most genuine stalls.
Still stuck? Support is a person, not a ticket system.